Having recently purchased a couple of Raspberry Pi 2’s to play with, I was intrigued to see what the recent Windows 10 IoT version was like running on it. Being able to run a windows platform on something like a Raspberry Pi would open up a lot of opportunities to put these great little computers to work.
I faithfully downloaded the image from Microsoft (you need to be registered to download it, but you can find details on how to do this on google pretty easily). Once downloaded I set about writing the image (in this case an FFU file) to an SD card. This is a fairly simple process using the DISM tool. This is where my problems started, when running the command to write the image to the SD card I would receive the error “The /applydrive option is not recognized in this context”. It seems that you can only use the Windows 10 version of DISM and I’m running Windows 8.1. Not having a spare machine to install Windows 10 Preview on I began the usual Google search to figure out how to install Windows 10 IoT on the Pi using windows 8.
There are a few guides out there, but none of them are that simple, so I figured I’d put together this simple guide to help anyone else in my position wanting to try the Raspberry Pi Windows 10 release if they only have an earlier version of windows.
Step 1 – Download The Windows 10 IoT & Windows 10 Preview
You will need to download both the Windows 10 IoT image and the Windows 10 Preview image, I won’t detail how or where to get these from, but if your reading this then you probably already have them.
Step 2 – Extract Windows 10 IoT image file
You will need to extract the Windows 10 IoT files from the archive you downloaded, the file we want is the one called “Flash.ffu”
Step 3 – Mount The Windows 10 Preview image file
In Windows 8 you can easily mound the ISO file for Windows 10 Preview (the desktop version). Just right click the ISO file and choose mount. If you’re running an earlier version of windows then there are plenty of options out there for mounting or extracting an ISO, just Google it, you’ll find it easily enough.
Step 4 – Unblock the FFU file
Find the “Flash.ffu” file you extracted earlier, right click it and select properties. If there is a button on the properties dialog called “Unblock”, click this, then click “OK” on the properties dialog.
Step 5 – Insert your SD card
Makes sure you have inserted your SD card into your card reader
Step 6 – Open a command prompt with Admin privileges
Once you have an Admin command prompt, you should change the folder to the one that contains the “Flash.ffu” file.
Step 7 – Determine the disk number of your SD card
We need to find out the disk number assigned to your SD card, start by running the following command top open the disk partition utility
DISKPART
Now run
LIST DISK
You should see something similar to this
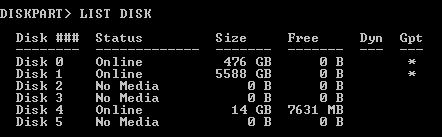
In my case, the SD card is Disk 4, make a note of this number, we’ll need it in a moment.
Run
EXIT
To get back to exit DISKPART and drop back to a regular command prompt
Step 8 – Write the Windows 10 IoT image to your SD card
To write the image you will need to run the following command, replacing “X:\source\dism.exe” with the drive letter to which the Windows 10 Preview image is mounted, so if it’s mounted on the G: drive, the command would be “G:\source\dism.exe”.
You will also need to replace the “PhysicalDriveN” with the drive number, so in my example this would become “PhysicalDrive4”
X:\sources\dism.exe /Apply-Image /ImageFile:flash.ffu /ApplyDrive:\\.\PhysicalDriveN /SkipPlatformCheck
After a few minutes the image will have been written. Safely eject your SD card and insert it into your Pi.
Step 9 – Enjoy Windows 10 IoT on your Raspberry Pi 2

Hi James M0YOM,
Nice install and instructions, I got win 10 IOT on rp3 too.
have you tried installing any amateur radio software on win 10 IOT ? E.g. JT65? Do you need to convert it to app for win 10 IOT?
Thanks, Dawood VR2XNG
Hi Dawood,
I’ve not tried much on Win 10 IoT, however apps would need to be converted in order to run on it (at least the version’s i’ve tried anyway)
73 James M0YOM